Monday, September 29, 2014

Red Sky At Night

Red sky at night, sailor's delight.
Red sky in the morning, sailor's warning

As it so often happens, I get inspired by some little thing and have to get it out of my head and onto a mosaic piece where it belongs.  In this case,  Mary and I recently made a trip to the Gulf of Mexico and saw a number of sailing ships and sunsets.  I started to sketch some of these and came up with this drawing.
Red Sky At Night Sketch

Weather systems typically move from west to east, and red clouds result when the sun shines on their undersides at either sunrise or sunset. At these two times of day, the sun's light is passing at a very low angle through a great thickness of atmosphere commonly known as The Belt of Venus. The result of which is the scattering out of most of the shorter wavelengths — the greens, blues, and violets — of the visible spectrum, and so sunlight is heavy at the red end of the spectrum. If the morning skies are red, it is because clear skies to the east permit the sun to light the undersides of moisture-bearing clouds coming in from the west. Conversely, in order to see red clouds in the evening, sunlight must have a clear path from the west in order to illuminate moisture-bearing clouds moving off to the east. There are many variations on this piece of lore, but they all carry the same message.

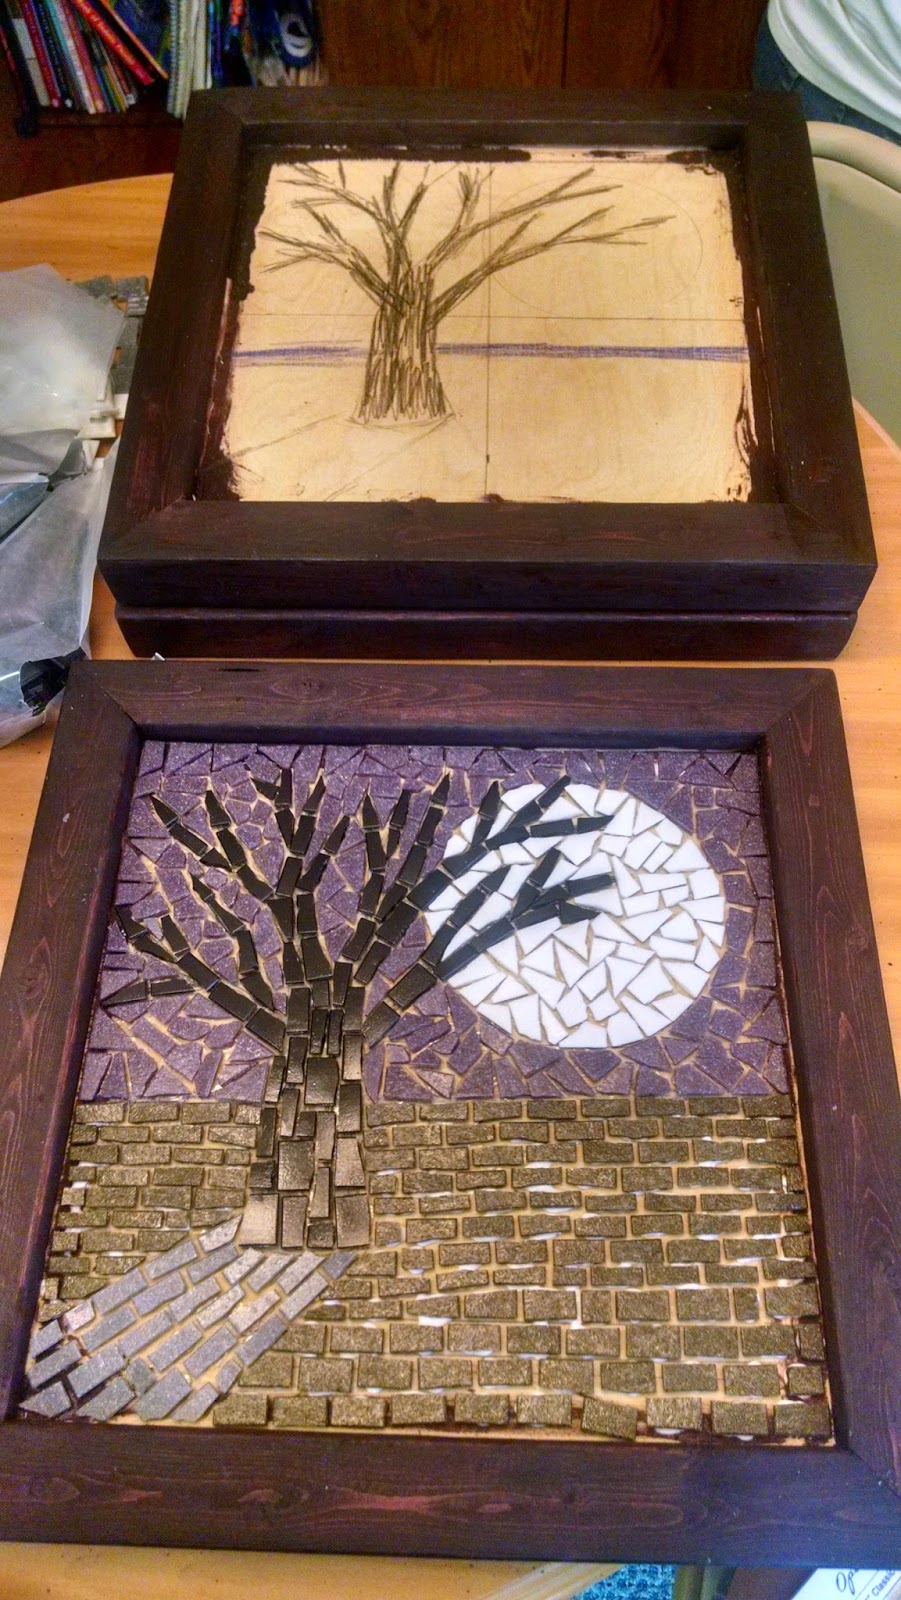
After the sketch, I transferred the drawing to an already prepared frame and began cutting and gluing the glass tiles.

Red Sky At Night Transferred to Frame


From Shakespeare's poem "Venus and Adonis"
Like a red morn, that ever yet betoken'd
Wreck to the seaman, tempest to the field,
Sorrow to shepherds, woe unto the birds,
Gusts and foul flaws to herdmen and to herds.
Half Way Home
And here is what the piece looks like after the cutting and gluing is complete.

The Colors I used are as follows:

Boat
- China White (A20) Hakatai
- Teak (B32) Hakatai

Sky
- Tomato, Mosaic Mercantile
- Poppy, Mosaic Mercantile
- Canary, Mosaic Mercantile
- Pumpkin, Mosaic Mercantile

Water
- Lilac (C12) Hakatai
- Deep Blue (C81) Deep Blue

Cutting and Gluing Complete
Next we do a little grouting using black grout.

Grouting
And here is the final product of "Red Sky at Night".

Red Sky At Night Final


Friday, August 29, 2014

The Butterfly Effect

Ok, I was hanging out in the backyard and saw a bunch of cool looking butterflies. "Hey", I said to myself, a butterfly would make a cool mosaic.

Backyard Butterfly Model
 So after a bit of doodling, this is the drawing I came up with.
Butterfly Sketch

Next I transferred the drawing to an already prepared frame.

Butterfly on Frame
And then I started cutting and gluing the glass tiles.  The colors I used are:

Butterfly - D93 Mandarin (Hakatai)
Butterfly - D41 Lava (Hakatai)
Butterfly - A20 China (Hakatai)
Butterfly - C39 Night Black (Hakatai)
Leaves - B82 Ficus (Hakatai)
Background - A59 Meadow (Hakatai)

Here are some time lapse photographs of the cutting and gluing process.

Time Lapse #1

Time Lapse #2

Time Lapse #3

Time Lapse #4

And here is what the project looks like after all of the cutting and gluing is complete.

Butterfly Cutting and Gluing Complete
And if one butterfly is good, two butterflies must be even better.

Making another Butterfly

And here is the artist with the final product.

Artist with Butterfly
And here is the final of the "Butterfly Effect".
The Butterfly Effect


Sunday, August 24, 2014

Moon Tree

Today's project is another that I have done previously. I last visited this subject about a year ago. This one has a simple but a powerful theme: A tree standing alone in the darkness, back lit by a full moon.  After completing this project, I can tell you that my technique has really improved in the last year.  I started with the same sketch that I used for the original but the end result is very different.  I should do the same piece a year from now and see if I am still improving.

Moon Tree Sketch
In keeping with my recent practice, I decided to build two moon trees at the same time.


The next step is a bunch of cutting and gluing.

Here are the colors that I am using for this project.

Tree - C39 Night Black (Hakatai)
Moon - A20 China (Hakatai)
Sky - A17 Grape (Hakatai)
Ground - B32 Teak (Hakatai)
Shadow - B39 Basalt (Hakatai)


On down and one to go.


After the cutting and gluing, it is time to grout.


And here is the artist with the final product.


And here is the final product of "Moon Tree" the next generation.


Sunday, August 3, 2014

Mary's Baubles

I just never know what is going to inspire me to create a mosaic.  This week as I was rooting around in my wife's craft cabinet, I discovered some wonderful glass baubles.  I instantly knew that I wanted to used them in a mosaic.

The Baubles
So I just started sketching on some blank paper and this is the design that I came up with.

The Sketch
And then I transferred the sketch to an already prepared frame.

The frame with transferred sketch and baubles
And then I filled in some tile around the baubles.  It is a lot of work cutting straight lines to fit around circles.

Gluing
And finally I finished cutting and gluing.  This was actually a fairly challenging piece considering it is a picture of nothing.  And it is time to grout.  For this piece, I am using a black grout to make the lines really pop out.

Grouting
And finally the piece is done.

The artist with "Mary's Baubles"
And a closeup of the final "Mary's Baubles".

Mary's Baubles


Saturday, July 26, 2014

Frog Bog

For today's project, I decided to make a couple more frogs.  This is the first time that I've tried to reproduce one of my previous creations.  I kind of had mixed emotions about doing this, but I've had several people request frogs.  So, if it is frogs they want, it is frogs they will get.  Luckily I keep a file with my previous art work and renderings. It really does make it easier to do the same piece again.

Frog Bog Grid Drawing
After transferring the drawing to my already prepared frame, I then began gluing.  I usually start with the central subject of the piece and then move to the background.  That way if I mess something up, I haven't wasted a lot of time.

Gluing the Frog
And after I completed frog number one I started immediately on frog number two.

Starting frog number two
And after gluing the glass tiles, I prepared the project for grouting using masking tape.

Preparing to Grout
And here we have the artist holding both frogs.

Two frog in hand are worth more than one in the pond
And here is the final of "Frog Bog"

Frog Bog Final


Thursday, July 17, 2014

Sunset Beach

I'm working on a new mosaic design.  This one I am calling Sunset Beach.  This has some similar elements to a large mosaic that I made last year called "Some Beach".  This one is much smaller and fits on a one foot square frame.

As always, I start with a rough sketch of my mosaic on a grid.

Sunset Beach Sketch

Next, I transfer the drawing to a already prepared frame.


And then I start gluing on the tiles.


In addition to the glass tiles, I also added a few sea shells from the Gulf of Mexico.


I didn't realize how many different colors I used on this project until I started writing them down at the end.
  • Sea Shells from Panama City Beach, Florida
  • Sand - Sand A15 (Hakatai) 3/4
  • Tree - Ficus B82 (Hakatai) 3/4
  • Tree - Night Black C39 (Hakatai) 3/4
  • Tree - Tan A42 (Maryland Mosaics) 3/8
  • Tree - Terra Cota C57 (Maryland Mosaics) 3/8
  • Water - Deep Blue C81 (Hakatai) 3/4
  • Sun - Canary D2205 (Maryland Mosaics) 3/8
  • Sun - Chili Pepper D111 (Maryland Mosaics) 3/8
  • Sky - Lake Blue A01 (Hakatai) 3/4
  • Sky - Iris A31 (Maryland Mosaics) 3/4
  • Sky - Fig (Mosaic Mercantile) 3/4
And if one mosaic beach is good, two must be better.

Two Beaches

And here is the final "Sunset Beach" after grouting.

Final Sunset Beach


Saturday, July 12, 2014

Crazy Tile Shipment

So, I'm trying out a new mosaic tile vendor this week.  I put in an order for 12 pounds of tiles from a company called Hakatai. The price of the tiles is very reasonable, so I am willing to wait a week for the ground shipment via UPS.  Just for giggles, I looked up the shipment tracking information on the UPS site today.  I was amazed at all of the stops these tiles have taken since they left the vendor in Oregon on Monday, 7 July.  So far these tiles have stopped in 13 different cities.  I couldn't even put all of the cities into Google Maps since they limit you to 10 stops on a single route.


I received the shipment one week after I placed the order.  The tiles were packaged in 1 pound plastic bags and the bags were placed in a large box with lots of packing peanuts.